Every year I decorate a few eggs for Easter. I like to try something new each year. This year I decided to try quilled paper eggs.
These quilled paper eggs took a long time to finish, but were very simple to make.
I cut pastel colored paper into strips 1/8" x 4.25", using my Fiskars cutter. I twirled the strips with a small quilling tool, and attached the quilled paper to hollowed eggshells with white tacky glue.
I just love the way they look!
If you want to see more of my "egg-speriments", visit my egg decorating page at my hobby site: http://www.hobbyloco.com/eggs.html
In the past, I have decorated eggs with buttons, embroidery floss, wax resist (pysanky), acrylic paint, and plain old food coloring.
Happy Crafting!
Showing posts with label paper. Show all posts
Showing posts with label paper. Show all posts
Tuesday, March 19, 2013
Monday, April 20, 2009
a fun and easy bird pattern
 I used a 2-piece bird pattern (free to download at Spool) to make this tiny bird.
 I printed the pattern at one-third the normal size and hand stitched the bird in felt. It is about 2-1/2" long and sits about 1 inch tall. I used a printed tie-dye felt for the top and a solid blue for the belly.
 The eggs are made from paperclay (very easy), painted with acrylic paints and coated with shiny varnish.
 I made the little nest from brown paper. I cut the paper into strips about 1/8" wide and 6-7" long. I then crumpled them and twisted them as much as I could, and shaped them into the nest shape. I cut a small circle (1-1/4" diameter) from brown paper for the bottom. I glued the shaped nest to the circle and glued bits of the paper down as needed to to stabilize the nest shape.
Super simple!
Sunday, April 06, 2008
Inchies !
OK, so here is what I have been up to lately... Inchies! I finally was bitten by the inchie bug. I have always loved tiny things, so this seems like a good match for me. I joined an inchie group to swap and learn/share new techniques and ideas. Here are some pictures of my creations.
------------------ Tape Transfer ------------------

These inchies were made with packing tape transfers over watercolor painted backgrounds. Here is a great packing tape transfer tutorial.
------------------ Let's Party! ------------------

I made a whole set of these inchies from decorative paper (printed paper, corrugated paper, and punches), my doodles, metallic ribbon and sequins.
------------------ Origami ------------------

I folded tiny little origami shapes (heart, tree and bat) to create these inchies.
Next up ... Interactive inchies with pop-ups, fold outs and moveable elements!

These inchies were made with packing tape transfers over watercolor painted backgrounds. Here is a great packing tape transfer tutorial.

I made a whole set of these inchies from decorative paper (printed paper, corrugated paper, and punches), my doodles, metallic ribbon and sequins.

I folded tiny little origami shapes (heart, tree and bat) to create these inchies.
Next up ... Interactive inchies with pop-ups, fold outs and moveable elements!
Friday, April 14, 2006
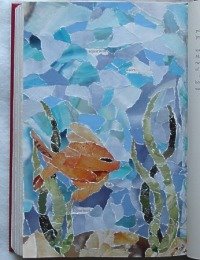
Torn Paper Mosaic
 I have been altering a book and just completed this page. This was the first time I ever made a torn paper mosaic. I really love the way it turned out! It was very easy to do and took about 4 or 5 hours to complete.
I plan to do more torn paper mosaics... maybe larger projects to hang on my walls! Anyone reading this, that has done this type of artwork... I would love to see it! Please add a comment with a link to your site.
If you would like to see more of the book I am altering (or more info about this mosaic), visit HobbyLoco.com. I have tons of hobbies & I post photos, how-to info, free patterns, etc.. on a regular basis.
Subscribe to:
Posts (Atom)


